Building a SearchView with UISearchBar and UITableView
Background
I’ve been working away on some iPhone programming lately and one of this first things I wanted to add to my app was a view for searching. What I wanted was to have a view that loads with the curser in the UISearchBar ready to go and to only load the results when the user presses the ‘Search’ button. The rest of this blog post will go through putting all this together. At the end you will have a Search View very similar to the one in the Flixster App and hopefully the knowhow to customize it further. If you would rather skip the step by step and jump right to the code be my guest.
Search View Requirements
- On load have the curser in the UISearchBar ready for user input.
- Search is only done once the ‘Search’ button is pressed.
- When entering the query any previous results should not be clickable.
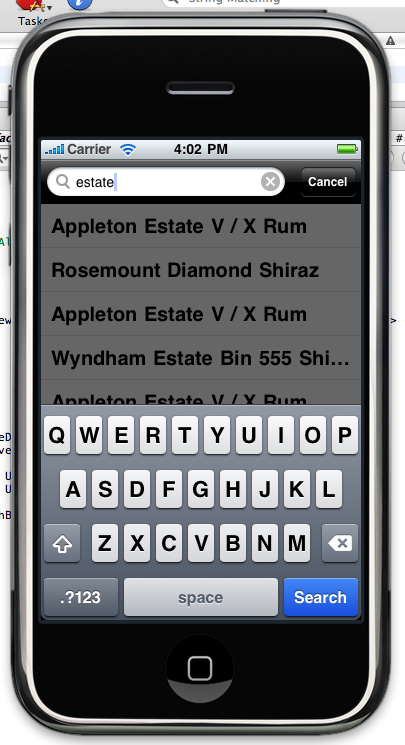
Here’s a look at what we’re going to end up with:

As a side note, if you’re just looking for a simple type-ahead style search (kind of like what is used in the App Store or Contacts App) you might want to take a look at the Search Bar and Search Display Controller that can be added from Interface Builder. I found it super easy to use for the simple case just described, but very difficult to customize for anything else.
Getting Started
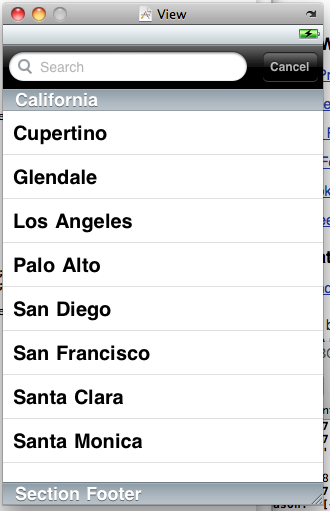
I’ll leave it up to you to do the basic setup for your app, I started with a Tab Bar application for mine but you can use whatever you like. I then created a Nib for the Search View and a corresponding SearchViewController.h/m that extends from UIViewController (more on the code for these files later on). With that done we jump into Interface builder to drop our UISearchBar and UITableView into our Nib. It should look something like what I have here:

Next up we want to add some IBOutlets in our SearchViewController.h so that we can refer to the UI elements we just added from our code. I am going to make these properties as per the Memory Management Guidelines from Apple. I’m also going to define a NSMutableArray to hold the data to display in the UITableView.
//
//  SearchViewController.h
//
#import <UIKit/UIKit.h>

@interface SearchViewController : UIViewController{
    NSMutableArray *tableData;

    UITableView *theTableView;
    UISearchBar *theSearchBar;
}
@property(retain) NSMutableArray *tableData;

@property (nonatomic, retain) IBOutlet UITableView *theTableView;
@property (nonatomic, retain) IBOutlet UISearchBar *theSearchBar;

@end
If you didn’t get XCode to generate this file for you make sure you include the import for UIKit.h.
Now we will quickly jump back to Interface Builder and hook those IBOutlets up before we forget. You’ll also want to make the UISearchBar and UITableView delegate to the SearchViewController so that we can handle the callbacks there.
With the Nib all set up lets make sure we synthesize those properties in SearchViewController.m and release the variables in our dealloc method.
//
//  SearchViewController.m
//
#import "SearchViewController.h"

@implementation SearchViewController
@synthesize tableData;

@synthesize theSearchBar;
@synthesize theTableView;

- (void)viewDidLoad {
    [super viewDidLoad];
    self.tableData =[[NSMutableArray alloc]init];
}

- (void)viewDidAppear:(BOOL)animated {
    [self.theSearchBar becomeFirstResponder];
    [super viewDidAppear:animated];
}

- (void)dealloc {
    [theTableView release], theTableView = nil;
    [theSearchBar release], theSearchBar = nil;
    [tableData dealloc];
    [super dealloc];
}
@end
I also snuck a little bit of code into viewDidLoad and ViewDidAppear; the former just initializing the tableData NSMutableArray and the later making our UISearchBar first responder. Making it the first responder causes the UISearchBar to get focus as soon as the view loads so that the user can start entering their query right away.
That’s a pretty good start, lets make sure it builds and see what we get when we run our app before going on.

Implementing the Protocols
We made the SearchViewController the delegate for both the UISearchBar and the UITableView so are going to implement the UISearchBarDelegate and UITableViewDataSource Protocols. First we need to add the Protocols to the SearchViewController.h header file.
//
//  SearchViewController.h
//
#import <UIKit/UIKit.h>

@interface SearchViewController : UIViewController
 <UISearchBarDelegate, UITableViewDataSource> {
	// Instance variables defined earlier
}
// Properties defined earlier

@end
Now we implement the methods in SearchViewController.m. There are a number of callback methods defined by the UISearchBarDelegate Protocol but we’re only interested in three: searchBarTextDidBeginEditing, searchBarCancelButtonClicked and searchBarSearchButtonClicked.
- (void)searchBarTextDidBeginEditing:(UISearchBar *)searchBar {
    [searchBar setShowsCancelButton:YES animated:YES];
    self.theTableView.allowsSelection = NO;
    self.theTableView.scrollEnabled = NO;
}
This method is called whenever the UISearchBar gets focus. When this happens we want to show the ‘Cancel’ button (animated:YES makes it slide in nicely) and disable the UITableView.
- (void)searchBarCancelButtonClicked:(UISearchBar *)searchBar {
    searchBar.text=@"";

    [searchBar setShowsCancelButton:NO animated:YES];
    [searchBar resignFirstResponder];
    self.theTableView.allowsSelection = YES;
    self.theTableView.scrollEnabled = YES;
}
When the ‘Cancel’ button is pressed we want to clear the UISearchBar text and hide the button. We also want the UISearchBar to resignFirstResponder status so that the keyboard hides and then enable the UITableView.
- (void)searchBarSearchButtonClicked:(UISearchBar *)searchBar {
    // You'll probably want to do this on another thread
    // SomeService is just a dummy class representing some
    // api that you are using to do the search
    NSArray *results = [SomeService doSearch:searchBar.text];

    [searchBar setShowsCancelButton:NO animated:YES];
    [searchBar resignFirstResponder];
    self.theTableView.allowsSelection = YES;
    self.theTableView.scrollEnabled = YES;

    [self.tableData removeAllObjects];
    [self.tableData addObjectsFromArray:results];
    [self.theTableView reloadData];
}
The last UISearchBarDelegate Protocol method is the callback for the ‘Search’ button being pressed. This is where we actually perform the search and add the results to the UITableView. The rest of this method implementation is the same as when the ‘Cancel’ button is pressed.
Finally we need to implement the UITableViewDataSource Protocol methods. I’m not going to go into a whole lot of detail here since there’s lots of info out there on implementing a UITableView.
- (NSInteger)tableView:(UITableView *)tableView
 numberOfRowsInSection:(NSInteger)section {
    return [tableData count];
}

- (UITableViewCell *)tableView:(UITableView *)tableView
         cellForRowAtIndexPath:(NSIndexPath *)indexPath {
    static NSString *MyIdentifier = @"SearchResult";
    UITableViewCell *cell = [tableView
     dequeueReusableCellWithIdentifier:MyIdentifier];

    if (cell == nil) {
        cell = [[[UITableViewCell alloc]
         initWithStyle:UITableViewCellStyleDefault
         reuseIdentifier:MyIdentifier] autorelease];
    }

    id *data = [self.tableData objectAtIndex:indexPath.row];
    cell.textLabel.text = data.name;
    return cell;
}
We’ve done lots of work now and it’s probably a good idea to make sure everything still builds. You should see something like this when you run the app:

At this point we’ve hit all three marks in the requirements I outlined earlier and we could call it quits. We could, but I think we could do a little bit more to help make the UITableView actually seem like it’s disabled when you go to search.
Fading out the UITableView
If you take another look at the Flixster App or even the initial screenshot I have in this post you will notice that when you are in ‘search mode’ the background of the screen is faded black. This effect helps to show the user that the UITableView is in fact disabled.
To get this behaviour I add and remove another UIView and adjust the opacity in an Animation so that in fades in smoothly. The first thing we need to do is create an instance variable and property for this disableViewOverlay as I called it and initialize it when the view loads.
#import "SearchViewController.h"

@implementation SearchViewController
@synthesize disableViewOverlay;
// Additional variable synthesizes

- (void)viewDidLoad {
    [super viewDidLoad];
    self.tableData =[[NSMutableArray alloc]init];
    self.disableViewOverlay = [[UIView alloc]
     initWithFrame:CGRectMake(0.0f,44.0f,320.0f,416.0f)];
    self.disableViewOverlay.backgroundColor=[UIColor blackColor];
    self.disableViewOverlay.alpha = 0;
}
I’ll leave it to you to figure out what to put in SearchViewController.m. Now that we have this UIView all set up all we have to do is fade it in when the UISearchBar gets focus. This was actually really easy to do, I just needed to add the disableViewOverlay as a subview and then use beginAnimations/commitAnimations for the fading.
- (void)searchBarTextDidBeginEditing:(UISearchBar *)searchBar {
    // Existing code

    // Fading in the disableViewOverlay
    self.disableViewOverlay.alpha = 0;
    [self.view addSubview:self.disableViewOverlay];

    [UIView beginAnimations:@"FadeIn" context:nil];
    [UIView setAnimationDuration:0.5];
    self.disableViewOverlay.alpha = 0.6;
    [UIView commitAnimations];
}

- (void)searchBarCancelButtonClicked:(UISearchBar *)searchBar {
    // Existing code

    // Removing the disableViewOverlay
    [disableViewOverlay removeFromSuperview];
}

- (void)searchBarSearchButtonClicked:(UISearchBar *)searchBar {
    // Existing code

    // Removing the disableViewOverlay
    [disableViewOverlay removeFromSuperview];
}
At the end of searchBarTextDidBeginEditing we added the code to fade in the disableViewOverlay, then at the end of searchBarCancelButtonClicked and searchBarSearchButtonClicked we remove the disableViewOverlay.
If you’ve been following along you might notice a bit of a code smell coming from these last three methods. There’s a lot of code duplication which I don’t really like so I actually re-factored these three methods and created another method that all of them can call. The resulting re-factored code looks like this:
- (void)searchBarTextDidBeginEditing:(UISearchBar *)searchBar {
    [self searchBar:searchBar activate:YES];
}

- (void)searchBarCancelButtonClicked:(UISearchBar *)searchBar {
    searchBar.text=@"";
    [self searchBar:searchBar activate:NO];
}

- (void)searchBarSearchButtonClicked:(UISearchBar *)searchBar {
    // SomeService is just a dummy class representing some
    // api that you are using to do the search
    NSArray *results = [SomeService doSearch:searchBar.text];

    [self searchBar:searchBar activate:NO];

    [self.tableData removeAllObjects];
    [self.tableData addObjectsFromArray:results];
    [self.theTableView reloadData];
}

- (void)searchBar:(UISearchBar *)searchBar activate:(BOOL) active{
    self.theTableView.allowsSelection = !active;
    self.theTableView.scrollEnabled = !active;
    if (!active) {
        [disableViewOverlay removeFromSuperview];
        [searchBar resignFirstResponder];
    } else {
        self.disableViewOverlay.alpha = 0;
        [self.view addSubview:self.disableViewOverlay];

        [UIView beginAnimations:@"FadeIn" context:nil];
        [UIView setAnimationDuration:0.5];
        self.disableViewOverlay.alpha = 0.6;
        [UIView commitAnimations];

        // probably not needed if you have a details view since you
        // will go there on selection
        NSIndexPath *selected = [self.theTableView
            indexPathForSelectedRow];
        if (selected) {
            [self.theTableView deselectRowAtIndexPath:selected
                animated:NO];
        }
    }
    [searchBar setShowsCancelButton:active animated:YES];
}
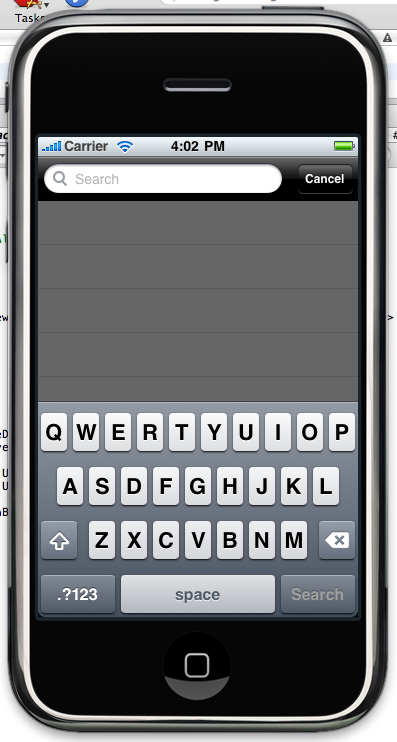
That cleans things up nicely. Now when you run the app you should have the main view fade out smoothly when you enter the UISearchBar just like mine below:

Conclusion
There we have it, a nice Search View that you have full control over. I’ve included the full code with inline comments below, have at it! If you have any suggestions or feedback please [leave a comment](http://jduff.github.com#comments!
<a id=’http://jduff.github.com/2010/03/01/building-a-searchview-with-uisearchbar-and-uitableview.html#full-code’ ></a>
SearchViewController.h
//
//  SearchViewController.h
//
#import <UIKit/UIKit.h>

@interface SearchViewController : UIViewController
 <UISearchBarDelegate, UITableViewDataSource> {
	NSMutableArray *tableData;

	UIView *disableViewOverlay;

	UITableView *theTableView;
	UISearchBar *theSearchBar;
}

@property(retain) NSMutableArray *tableData;
@property(retain) UIView *disableViewOverlay;

@property (nonatomic, retain) IBOutlet UITableView *theTableView;
@property (nonatomic, retain) IBOutlet UISearchBar *theSearchBar;

- (void)searchBar:(UISearchBar *)searchBar activate:(BOOL) active;

@end
SearchViewController.m
//
//  SearchViewController.m
//
#import "SearchViewController.h"

@implementation SearchViewController
@synthesize tableData;
@synthesize disableViewOverlay;
@synthesize theSearchBar;
@synthesize theTableView;


// Initialize tableData and disabledViewOverlay
- (void)viewDidLoad {
    [super viewDidLoad];
    self.tableData =[[NSMutableArray alloc]init];
    self.disableViewOverlay = [[UIView alloc]
     initWithFrame:CGRectMake(0.0f,44.0f,320.0f,416.0f)];
    self.disableViewOverlay.backgroundColor=[UIColor blackColor];
    self.disableViewOverlay.alpha = 0;
}

// Since this view is only for searching give the UISearchBar
// focus right away
- (void)viewDidAppear:(BOOL)animated {
    [self.theSearchBar becomeFirstResponder];
    [super viewDidAppear:animated];
}

#pragma mark -
#pragma mark UISearchBarDelegate Methods

- (void)searchBar:(UISearchBar *)searchBar
    textDidChange:(NSString *)searchText {
  // We don't want to do anything until the user clicks
  // the 'Search' button.
  // If you wanted to display results as the user types
  // you would do that here.
}

- (void)searchBarTextDidBeginEditing:(UISearchBar *)searchBar {
    // searchBarTextDidBeginEditing is called whenever
    // focus is given to the UISearchBar
    // call our activate method so that we can do some
    // additional things when the UISearchBar shows.
    [self searchBar:searchBar activate:YES];
}

- (void)searchBarTextDidEndEditing:(UISearchBar *)searchBar {
    // searchBarTextDidEndEditing is fired whenever the
    // UISearchBar loses focus
    // We don't need to do anything here.
}

- (void)searchBarCancelButtonClicked:(UISearchBar *)searchBar {
    // Clear the search text
    // Deactivate the UISearchBar
    searchBar.text=@"";
    [self searchBar:searchBar activate:NO];
}

- (void)searchBarSearchButtonClicked:(UISearchBar *)searchBar {
    // Do the search and show the results in tableview
    // Deactivate the UISearchBar

    // You'll probably want to do this on another thread
    // SomeService is just a dummy class representing some
    // api that you are using to do the search
    NSArray *results = [SomeService doSearch:searchBar.text];

    [self searchBar:searchBar activate:NO];

    [self.tableData removeAllObjects];
    [self.tableData addObjectsFromArray:results];
    [self.theTableView reloadData];
}

// We call this when we want to activate/deactivate the UISearchBar
// Depending on active (YES/NO) we disable/enable selection and
// scrolling on the UITableView
// Show/Hide the UISearchBar Cancel button
// Fade the screen In/Out with the disableViewOverlay and
// simple Animations
- (void)searchBar:(UISearchBar *)searchBar activate:(BOOL) active{
    self.theTableView.allowsSelection = !active;
    self.theTableView.scrollEnabled = !active;
    if (!active) {
        [disableViewOverlay removeFromSuperview];
        [searchBar resignFirstResponder];
    } else {
        self.disableViewOverlay.alpha = 0;
        [self.view addSubview:self.disableViewOverlay];

        [UIView beginAnimations:@"FadeIn" context:nil];
        [UIView setAnimationDuration:0.5];
        self.disableViewOverlay.alpha = 0.6;
        [UIView commitAnimations];

        // probably not needed if you have a details view since you
        // will go there on selection
        NSIndexPath *selected = [self.theTableView
            indexPathForSelectedRow];
        if (selected) {
            [self.theTableView deselectRowAtIndexPath:selected
                animated:NO];
        }
    }
    [searchBar setShowsCancelButton:active animated:YES];
}


#pragma mark -
#pragma mark UITableViewDataSource Methods

- (NSInteger)tableView:(UITableView *)tableView
 numberOfRowsInSection:(NSInteger)section {
    return [tableData count];
}

- (UITableViewCell *)tableView:(UITableView *)tableView
         cellForRowAtIndexPath:(NSIndexPath *)indexPath {
    static NSString *MyIdentifier = @"SearchResult";
    UITableViewCell *cell = [tableView
     dequeueReusableCellWithIdentifier:MyIdentifier];

    if (cell == nil) {
        cell = [[[UITableViewCell alloc]
         initWithStyle:UITableViewCellStyleDefault
         reuseIdentifier:MyIdentifier] autorelease];
    }

    id *data = [self.tableData objectAtIndex:indexPath.row];
    cell.textLabel.text = data.name;
    return cell;
}

#pragma mark -
#pragma mark Memory Management Methods

- (void)didReceiveMemoryWarning {
    // Releases the view if it doesn't have a superview.
    [super didReceiveMemoryWarning];
    // Release any cached data, images, etc that aren't in use.
}

- (void)viewDidUnload {
    // Release any retained subviews of the main view.
    // e.g. self.myOutlet = nil;
}


- (void)dealloc {
    [theTableView release], theTableView = nil;
    [theSearchBar release], theSearchBar = nil;
    [tableData dealloc];
    [disableViewOverlay dealloc];
    [super dealloc];
}

@end
Comments
comments powered by Disqus